Evil spammer
Evil spammer is the cli tool placed in tools/evil-spammer that allows to easily spam and stress test the network. It utilises client libraries evilwallet and evilspammer. Many predefined conflict and non-conflict scenarios are available to use directly with the evilwallet package, by command lines arguments of Evil Spammer tool, and by its interactive mode.
The main goal is to test how the network will handle more complicated spam scenarios and find as many bugs as possible!
Main features:
- easily spam and stress test the GoShimmer network with the predefined scenarios
- ability to enable deep spam mode that reuses outputs created during the spam
- spamming with the command lines
- spamming with the interactive mode
If you have any idea on some nice scenarios, do not hesitate to open the PR, and we can extend our list with your ideas! Also, do not forget to choose the right name for your spam.
How to be evil?
There are many options, but we encourage you to use our Evil Spammer Tool. It is available in a form of command line tool and in the interactive mode.
The compiled versions of the tool for Windows, Linux, macOS are available in goshimmer releases.
Evil spammer command line
The tool starts with the main.go file in tools/evil-spammer.
Currently available script names:
basicquickinteractive
Run go run . <SCRIPT_NAME> --help to get the list of parameters available for each script and their descriptions.
Basic spammer. Basic spammer can be run with:
cd tools/evil-spammer
go run . basic
and providing spam parameters with flags. Below is an example with custom spam:
# under tools/evil-spammer
go run . basic --spammer custom --scenario <scenario-name> --rate 5 --duration 30s
It is possible to start multiple spam types at once by providing parameters separated by commas.
go run . basic --urls http://localhost:8080 --spammer ds,blk,custom --rate 5,10,2 --duration 20s,20s,20s --tu 1s --scenario peace
Quick Test
Can be used for fast and intense spamming test. First is transaction spam, next data spam, which should reduce the tip pool size if there was any, and double spend at the end.
Example usage:
# under tools/evil-spammer
go run . quick --urls http://localhost:8080,http://localhost:8090 --rate 50 --duration 1m --tu 1s --dbc 100ms
Go interactive!
Simply run
# under tools/evil-spammer
go run . interactive
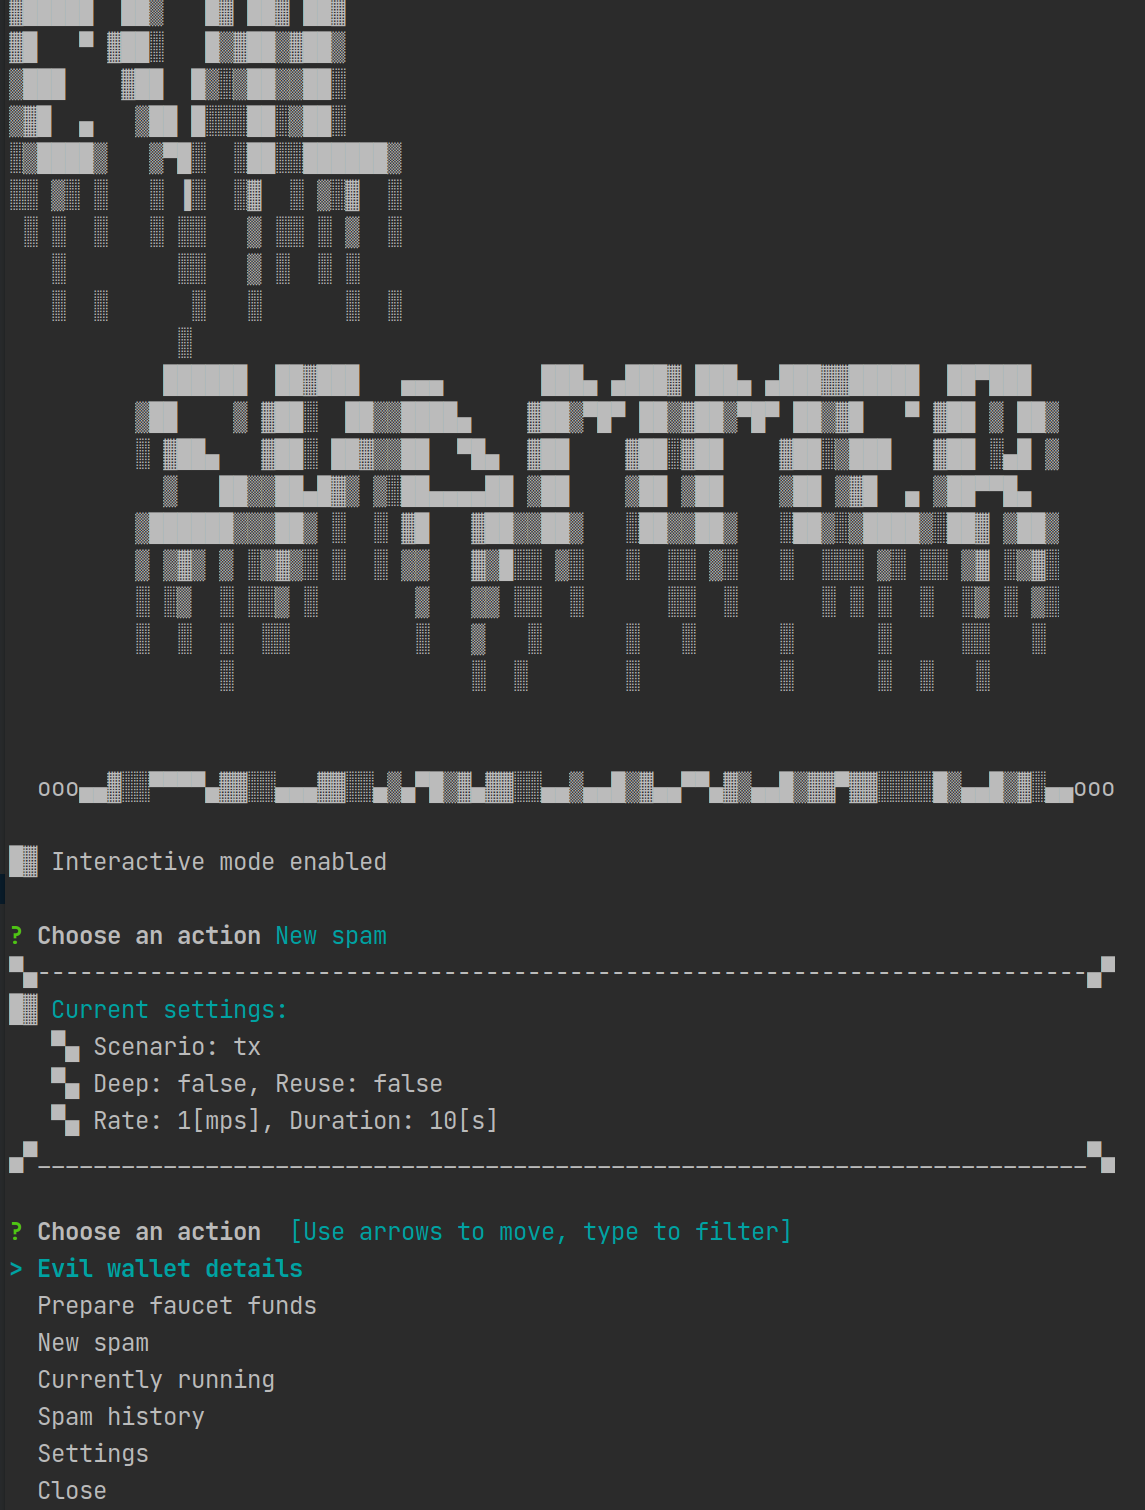
Evil wallet will start with API endpoints configured for the local docker network, if you want to play with different nodes on different network you need to update urls in the config.json file and restart the tool, or update it directly in the settings menu. The url for the DevNet is: http://nodes.nectar.iota.cafe The url for the devnet is: http://nodes.nectar.iota.cafe
Some nodes might have double spend filter enabled. In that case, to correctly execute N-spend (a conflict set with size N) in scenarios, you need to provide at least N distinct urls to issue them simultaneously. The evil tool will pop an warning if more urls are needed. We disabled the double spend filter for now on our nodes - everything should work also with only one url provided, so you don't need to worry about the warning.
E.g. to correctly spam with pear you should have 4 clients configured.
Requesting funds
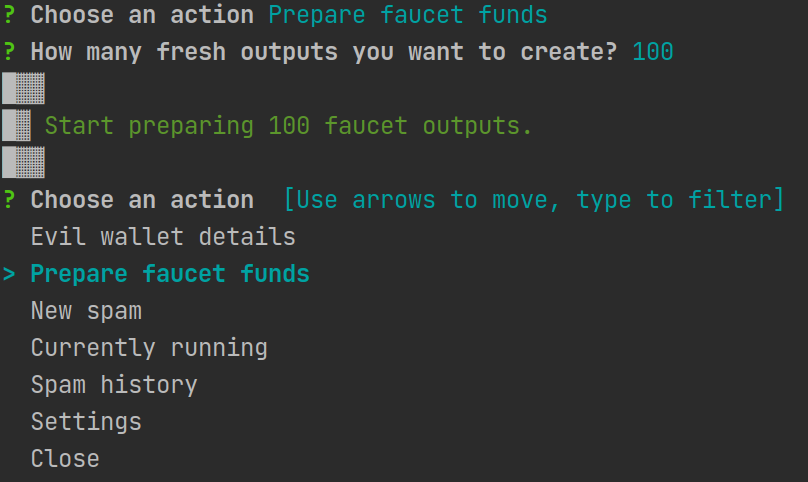
In order to request faucet funds choose "Prepare faucet funds" option, and Evil Spammer will send the faucet request and split the output on the requested number. The fastest is 100 outputs, as we wait only for one transaction to be confirmed, the more output you request the longer you will need to wait.
⚠️ On the DevNet due to higher PoW and congestion in the network, a creation of more than 100 outputs can not always be successful (as it tries to create 100 splitting transactions at once), that's why we encourage you to use 100 option on the DevNet, and play with higher spam rates and requesting large amounts of outputs in the local docker network.
You can also enable auto funds requesting, that will trigger funds preparation whenever you'll be short on faucet outputs.
Just go to: Settings -> Auto funds requesting -> enable. However, as mentioned above this is recommended only on private networks, where you have enough network throughput share.
Wallet status
You can check how many outputs is available in the "Evil wallet details".

- faucet outputs are outputs created from the faucet requests
- reuse outputs are the outputs available for the deep spam, you can collect them by changing reuse spam options to enable in
New Spam -> Update spam options. Later if you enable the deep spam inUpdate spam optionsthey will be used as the batch inputs and will create deep DAG structures. - and the statistics about spammed data blocks, value blocks and whole scenarios.
Other things worth to know
- Saving the evil wallet states is not supported. But don't worry you still can request more fresh Faucet outputs with just one click!
- Wallet will generate a
config.jsonfile if it did not exist. You can use it to set up your favorite settings or webAPI urls. - We encourage you to see the results of your spams and structures in the DAGs Visualizer that by default can be accessed on port
8061. - Spammer allows for max 5 concurrently running spams, you can check currently running spams and cancel them at any time.
- Spammer tool keeps track of your last spams history, so you can check the times of the spam and render a specific period with the visualizer.
- In spam options you can enable
deepspam, in which the spammer will reuse outputs generated by the current spam, previous spams withreuseoption enabled, and previous deep spams' outputs. - By default, the spam rate is set to mps, but you can change the time unit in the config file, e.g.
"timeUnit": "1m"for block per minute.
Predefined scenarios
Below you can find a list of predefined scenarios.
- in the client library they can be accessed by the function
GetScenario(scenarioName string) (batch EvilBatch, ok bool) - in the evil spammer tool with command line you can use
basicoption andscenarioflag to choose the scenario by name. - in the evil spammer tool with interactive mode simply go to
New Spam -> Change scenarioand select from the list.
In the below diagrams, the white box represents a transaction, the yellow box is an output, the green box is an input, and the numbers in yellow and green boxes are aliases for inputs and outputs.
No conflicts
single-tx
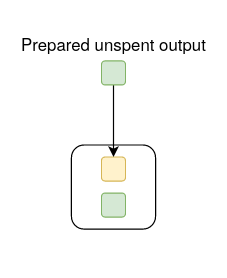
peace
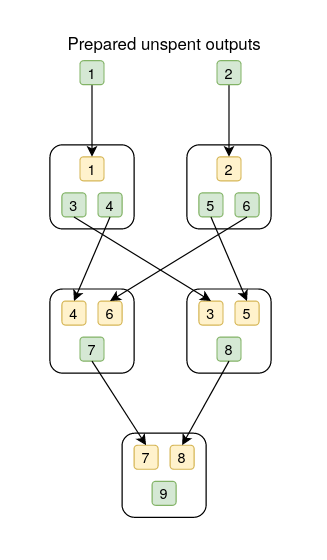
Conflicts
ds
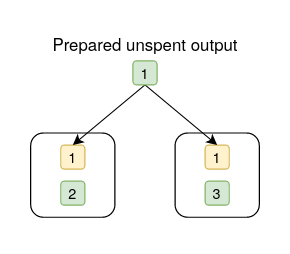
conflict-circle
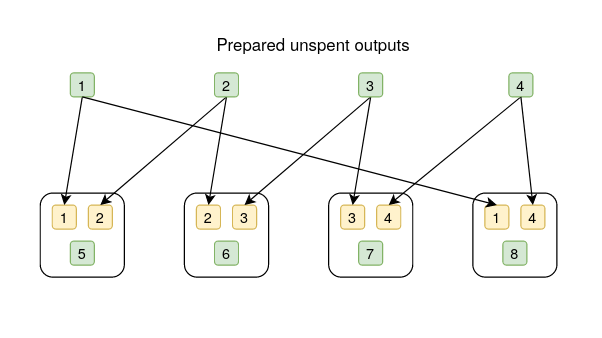
guava
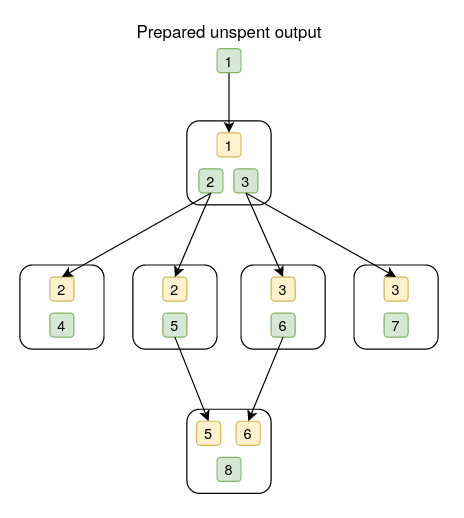
orange
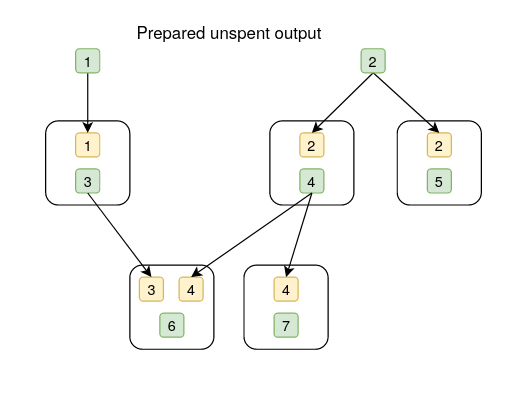
mango
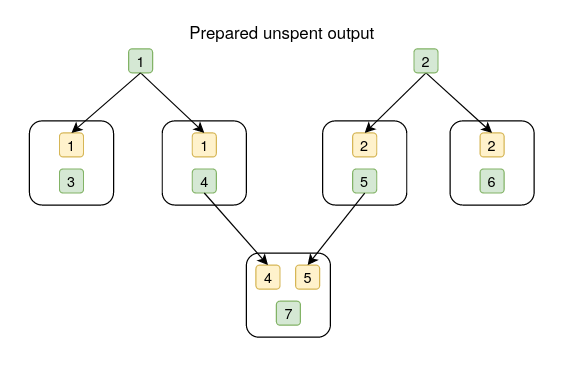
pear
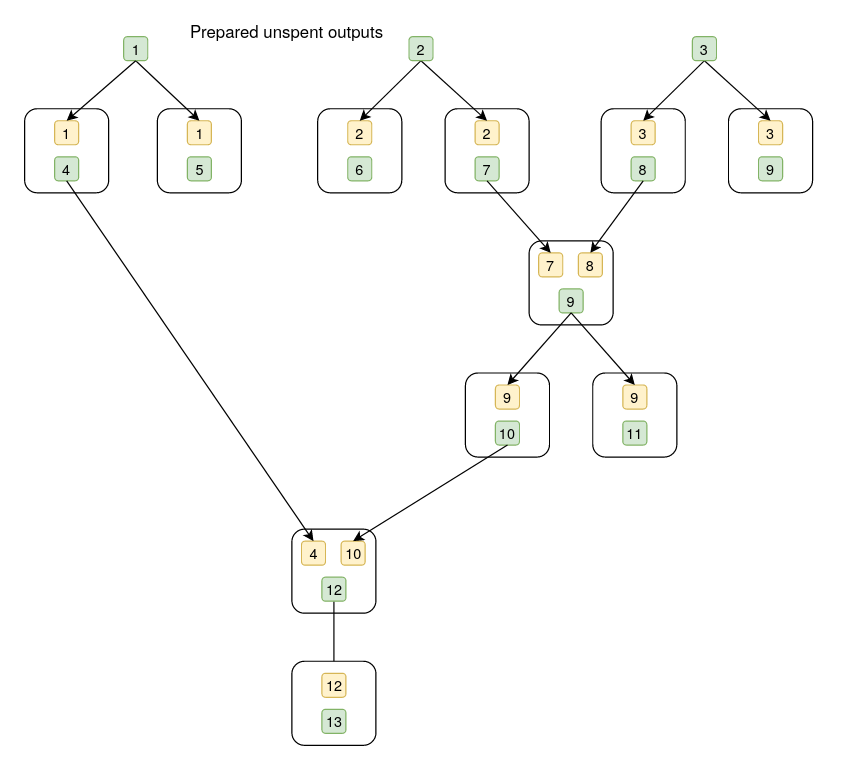
lemon
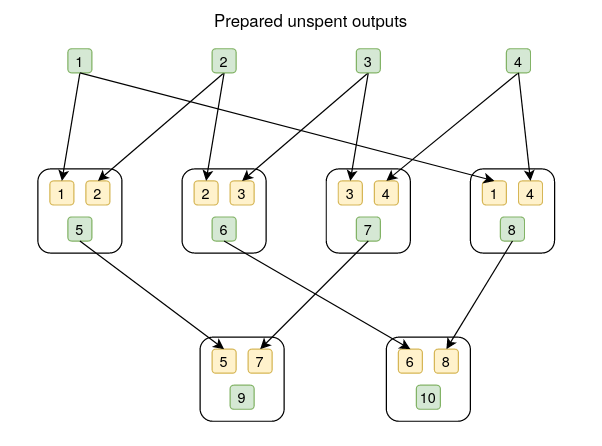
banana
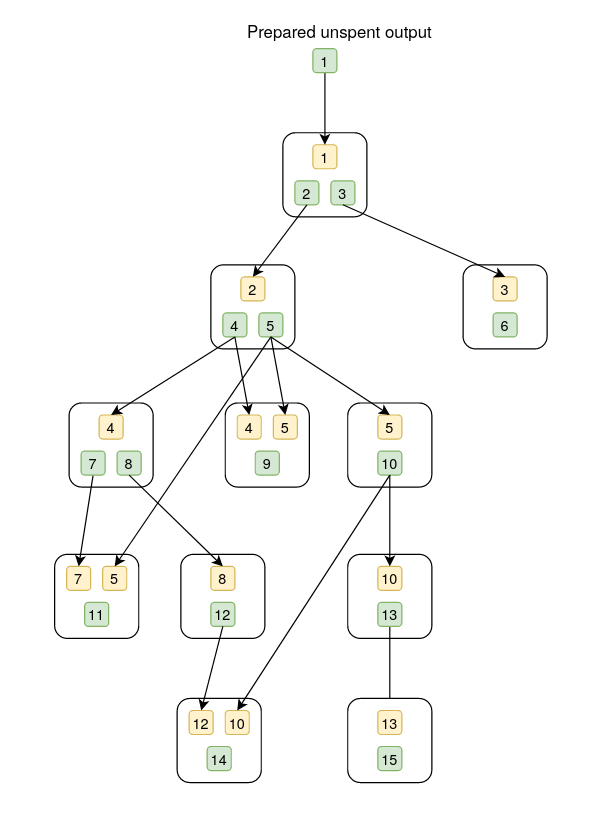
kiwi
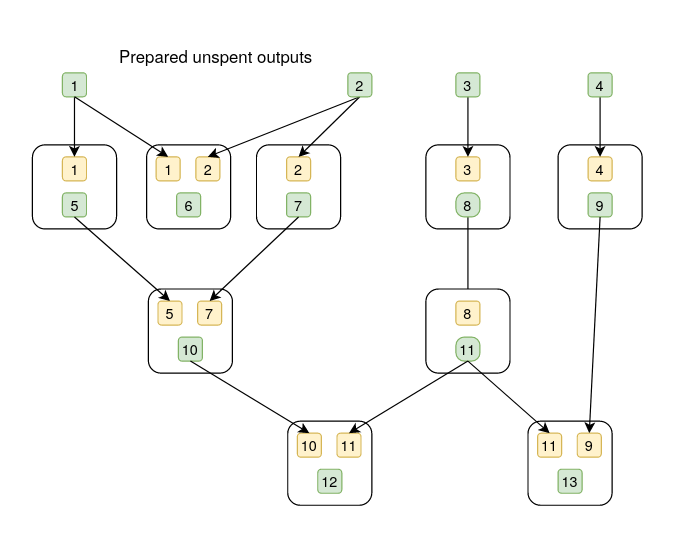
Evil Wallet and Evil spammer lib
⚠️ This section is a guide for the users that wants to create their own tools or scenarios
with the `evilwallet` and `evilwallet` library.
If you simply want to spam, you can use the evil spammer tool and its interactive mode described above.
The wallet library was designed with the focus on the spamming use cases. The evil wallet is a collection of many wallets (many seeds) that can be provided by the user, build from the faucet requests or are created during the spam.
While creating the wallet we can provide the nodes webAPI urls, that will be ordered to spam. Otherwise, it will use default endpoints for the local docker network.
// provide webAPI urls
evilWallet := evilwallet.NewEvilWallet("http://localhost:1234", "http://localhost:2234")

// automatically adds docker network as endpoints.
evilWallet := evilwallet.NewEvilWallet()
Request funds from the faucet
Then in order to send transactions, we need to request funds from the Faucet. The evil wallet sends the request and splits the received funds on requested number of outputs that are further used as inputs for the spamming batches.
Evil spammer does not care about the value of sent transactions, it simply splits the input value equally among the outputs during the spam. Below are presented all possibilities for requesting funds. Requesting more allows you to spam harder, but you need to wait more for outputs preparation.
// 100 ouptuts
evilwallet.RequestFreshFaucetWallet()

// 10k outputs
evilwallet.RequestFreshBigFaucetWallet()

// x * 10k outputs
evilwallet.RequestFreshBigFaucetWallets(x)
Create and send a transaction
The evil wallet allows you to easily build a transaction by providing a list of options, such as inputs/outputs and issuer, see evilwallet/options for more options.
There are 2 ways to assign inputs of a transaction:
- alias(es)
- unspent outputs ID(s) By assigning alias to an output will come in handy when you want to spend the specific output without knowing its actual output ID, and the evil wallet will handle the mapping for you.
There are 2 ways to assign outputs of a transaction in OutputOption:
type OutputOption struct {
    aliasName string
    color     ledgerstate.Color
    amount    uint64
}
- with alias
- if amount is not specified, all balances will be sent to provided output alias(es)
- without alias
- if amount is less than the balances of input, remainder will be taken care of.
The default color is IOTA if not specified.
⚠️ You need to register an alias for the output if inputs are provided with alias and the other way around. Currently, evil wallet does not accept the mixing usage, for example,
in:alias -> out:without alias.
Examples:
// invalid, mixing usage: in:alias -> out:without alias
txA, err := evilwallet.CreateTransaction(WithInputs("1"), WithOutput(&OutputOption{amount: 1000000}), WithIssuer(initWallet))

// valid, Create Transaction will send all balances from input to output.
txB, err := evilwallet.CreateTransaction(WithInputs("1"), WithOutput(&OutputOption{aliasName: "2"}), WithIssuer(initWallet))

// valid, CreateTransaction will send 1000000 to `2`, and prepare a remainder if needed.
txC, err := evilwallet.CreateTransaction(WithInputs("1"), WithOutput(&OutputOption{aliasName: "2", amount: 1000000}), WithIssuer(initWallet))
To send a transaction, you need to get client(s) from the evil wallet and send it:
clients := evilwallet.GetClients(1)

clients[0].PostTransaction(txC)
Compose your own scenario!
The most exciting part of evil wallet is to create whatever scenario easily!
The custom spend is constructed in []ConflictSlice, here's an example of guava:
err = evilwallet.SendCustomConflicts([]ConflictSlice{
    {
        // A
        []Option{WithInputs("1"), WithOutputs([]*OutputOption{{aliasName: "2"}, {aliasName: "3"}}), WithIssuer(wallet)},
    },
    {
        // B
        []Option{WithInputs("2"), WithOutput(&OutputOption{aliasName: "4"})},
        []Option{WithInputs("2"), WithOutput(&OutputOption{aliasName: "5"})},
    },
    {
        // C
        []Option{WithInputs("3"), WithOutput(&OutputOption{aliasName: "6"})},
        []Option{WithInputs("3"), WithOutput(&OutputOption{aliasName: "7"})},
    },
    {
        // D
        []Option{WithInputs([]string{"5", "6"}), WithOutput(&OutputOption{aliasName: "8"})},
    },
})
Each element in the ConflictSlice (A, B, C and D) contains 1 or more []Option, which is options of a transaction to create, that is A contains 1 transaction, and B contains 2 transactions, etc. Transactions are issued by order (A -> B -> C -> D), but they are issued simultaneously in the same ConflictSlice element in order to create double spends.
Below is an runnable example to send guava scenario:
evilwallet := NewEvilWallet()

wallet, err := evilwallet.RequestFundsFromFaucet(WithOutputAlias("1"))

err = evilwallet.SendCustomConflicts([]ConflictSlice{
    {
        // A
        []Option{WithInputs("1"), WithOutputs([]*OutputOption{{aliasName: "2"}, {aliasName: "3"}}), WithIssuer(wallet)},
    },
    {
        // B
        []Option{WithInputs("2"), WithOutput(&OutputOption{aliasName: "4"})},
        []Option{WithInputs("2"), WithOutput(&OutputOption{aliasName: "5"})},
    },
    {
        // C
        []Option{WithInputs("3"), WithOutput(&OutputOption{aliasName: "6"})},
        []Option{WithInputs("3"), WithOutput(&OutputOption{aliasName: "7"})},
    },
    {
        // D
        []Option{WithInputs([]string{"5", "6"}), WithOutput(&OutputOption{aliasName: "8"})},
    },
})
Evil spammer library
To use the evil spammer, you need to:
- prepare an evil wallet and request funds,
- prepare evil scenario if any,
- prepare evil spammer options, such as duration, spam rate, etc.,
- create a spammer and start spamming.
The behaviour of the spammer is controlled by:
- Spam options
- Evil Scenario
Example of the simple spam with double spends:
evilWallet := evilwallet.NewEvilWallet()
err := evilWallet.RequestFreshFaucetWallet()

scenarioDs := evilwallet.NewEvilScenario(
    evilwallet.WithScenarioCustomConflicts(evilwallet.DoubleSpendBatch(5)),
)

options := []Options{
    WithSpamRate(5, time.Second),
    WithSpamDuration(time.Second * 10),
    WithEvilWallet(evilWallet),
    WithEvilScenario(scenarioDs),
}

dsSpammer := NewSpammer(dsOptions...)
dsSpammer.Spam()
The spammer will treat the provided spamming custom conflicts as a single batch, which will be sent with the provided rate.
So if you use guava scenario and rate 5 mps per batch you will be spamming 30 mps on average
(as the guava creates 6 distinct transactions).
Spam options
- To change the spamming rate use
WithSpamRate(rate int, timeUnit time.Duration) Options
- Duration of the spam can be controlled by either providing duration time or specifying how many batches should be sent.
WithSpamDuration(maxDuration time.Duration) Options
WithBatchesSent(maxBatchesSent int) Options
- If you want to create multiple spams and use the same Evil Wallet instance you can provide it with
WithEvilWallet(evilWallet),
- To customize the spamming batch and spam behavior, provide EvilScenario
WithEvilScenario(scenario *evilwallet.EvilScenario) Options
- By default spammer uses batch spamming function, but you can also spam with data blocks by using:
WithSpammingFunc(evilspammer.DataSpammingFunction)
Evil Scenario
There are several scenario batches in evilwallet/customscenarios already, which are shown in previous section.
Besides, you are able to define your own spamming scenario with alias in EvilBatch, which is similar to the ConflictBatch in evil wallet but rather simple. Only aliases for inputs and outputs are needed, then the evil spammer will find valid unspent outputs automatically, match outputs to provided aliases and start issuing transactions. Finally, make your defined scenario ([]EvilBatch) an option with WithScenarioCustomConflicts and pass it to NewEvilScenario.
Below is guava scenario:
EvilBatch{
    []ScenarioAlias{
        {Inputs: []string{"1"}, Outputs: []string{"2", "3"}},
    },
    []ScenarioAlias{
        {Inputs: []string{"2"}, Outputs: []string{"4"}},
        {Inputs: []string{"2"}, Outputs: []string{"5"}},
    },
    []ScenarioAlias{
        {Inputs: []string{"3"}, Outputs: []string{"6"}},
        {Inputs: []string{"3"}, Outputs: []string{"7"}},
    },
    []ScenarioAlias{
        {Inputs: []string{"6", "5"}, Outputs: []string{"8"}},
    },
}
Deep spamming
Except basic functionality to customize spam batches, set the rate and duration, the Evil Spammer allows also for deep spamming.
To create deep conflict and UTXO structure you need to enable the deep spam with an option
evilwallet.WithScenarioDeepSpamEnabled()
The spammer will reuse outputs created during that it remembers from previous spams or if you provide a specific input RestrictedReuse wallet containing outputs generated during some previous spam.
If you want to save outputs from the spam for a specific usage in the future, and you don't want the Evil Wallet to remember it and use it automatically you need to provide RestrictedReuse wallet.
After spam ends, you can use this wallet in the next deep spam.
In the example below, we firstly save outputs from a simple tx spam and use the outputs later in the controlled manner to create deep spam with level 2.
evilWallet := evilwallet.NewEvilWallet()

evilWallet.RequestFreshFaucetWallet()

// outputs from tx spam will be saved here, this wallet can be later reused as an input wallet for deep spam
restrictedOutWallet := evilWallet.NewWallet(evilwallet.RestrictedReuse)

// transaction spam is the default one, no need to provide custom scenario batch
scenarioTx := evilwallet.NewEvilScenario(
    evilwallet.WithScenarioReuseOutputWallet(restrictedOutWallet),
)
guava, _ := GetScenario("guava")
customScenario := evilwallet.NewEvilScenario(
    evilwallet.WithScenarioDeepSpamEnabled(),
    evilwallet.WithScenarioInputWalletForDeepSpam(restrictedOutWallet),
    evilwallet.WithScenarioCustomConflicts(guava),
)

options := []Options{
    WithSpamRate(5, time.Second),
    WithBatchesSent(50),
    WithEvilWallet(evilWallet),
}
txOptions := append(options, WithEvilScenario(scenarioTx))
customOptions := append(options, WithEvilScenario(customScenario))

txSpammer := NewSpammer(txOptions...)
customDeepSpammer := NewSpammer(customOptions...)

txSpammer.Spam()
customDeepSpammer.Spam()
If you want to use the outputs generated within the same spam you can instruct the spammer to save the outputs to the Reuse wallet and make it the input wallet for the spam at the same time, like in the example below:
evilWallet := evilwallet.NewEvilWallet()

evilWallet.RequestFreshFaucetWallet()

outWallet := evilWallet.NewWallet(evilwallet.Reuse)

customScenario := evilwallet.NewEvilScenario(
    evilwallet.WithScenarioDeepSpamEnabled(),
    evilwallet.WithScenarioInputWalletForDeepSpam(outWallet),
    evilwallet.WithScenarioReuseOutputWallet(outWallet),
    evilwallet.WithScenarioCustomConflicts(evilwallet.Scenario1()),
)

options := []Options{
    WithSpamRate(1, time.Second),
    WithBatchesSent(50),
    WithEvilWallet(evilWallet),
}
customOptions := append(options, WithEvilScenario(customScenario))

customDeepSpammer := NewSpammer(customOptions...)

customDeepSpammer.Spam()