How to Run Hornet On Kubernetes
This page explains how to run IOTA mainnet Hornet nodes in a Kubernetes (K8s) environment. Kubernetes is a portable, extensible, open-source platform for managing containerized workloads and services that facilitates both declarative configuration and automation. It has a large, rapidly growing ecosystem. K8s services, support, and tools are widely available on multiple cloud providers.
If you are not familiar with K8s we recommend you to start by learning the K8s technology.
Introduction
Running Hornet mainnet nodes on K8s can enjoy all the advantages of a declarative, managed, portable and automated container-based environment. However, as Hornet is a stateful service with several persistence, configuration and peering requirements, the task can be challenging. To overcome it, the IOTA Foundation under the one-click-tangle repository umbrella is providing K8s recipes and associated scripts that intend to educate developers on how nodes can be automatically deployed, peered and load balanced in a portable way.
This script allows you to run sets of Hornet instances "in one click" in your K8s' environment of choice and also provides a blueprint with the best practices K8s administrators can leverage when deploying production-ready environments.
Deploying Using the “One Click” Script
For running the one click script you need to get access to a K8s cluster. For local development, we recommend microk8s. Instructions on how to install it can be found here. You may also need to enable the ingress add-on on micro-k8s by running microk8s.enable ingress.
You will also need to properly configure the kubectl command-line tool to get access to your cluster.
You can pass the following parameters as variables on the command line to the one-click script:
NAMESPACE: The namespace where the one-click script will create the K8s objects.tangleby default.PEER: A multipeer address that will be used to peer your nodes with. If you do not provide an address, auto-peering will be configured for the set's first Hornet Node (hornet-0).INSTANCES: The number of Hornet instances to be deployed.1by default.INGRESS_CLASS: The class associated with the Ingress object that will be used to externally expose the Node API endpoint so that it can be load balanced. It can depend on the target K8s environment.nginxby default.
You can deploy a Hornet Node using the default parameter values by running the following command:
hornet-k8s.sh deploy
After executing the script, different Kubernetes objects will be created under the tangle namespace, as enumerated and depicted below. You can see the kubectl instruction to get more details about them.

- Namespace where all the objects live,
tangleby default.
kubectl get namespaces
NAME              STATUS   AGE
default           Active   81d
tangle            Active   144m
kube-node-lease   Active   81d
kube-public       Active   81d
kube-system       Active   81d
- A StatefulSet named
hornet-setthat controls the different Hornet instances and enables scaling them.
kubectl get statefulset -n tangle -o=wide
NAME         READY   AGE   CONTAINERS   IMAGES
hornet-set   1/1     20h   hornet       gohornet/hornet:1.1.3
- One Pod per Hornet Node bound to our StatefulSet. A pod is an artifact that executes the Hornet Docker container.
kubectl get pods -n tangle
NAME           READY   STATUS    RESTARTS   AGE
hornet-set-0   1/1     Running   0          20h
You may have noticed that the pod's name is the concatenation of the name of the Statefulset hornet-set plus an index indicating the pod number in the set (in this case 0). If you scaled your StatefulSet to 2, you would have two pods (hornet-set-0 and hornet-set-1).
- One Persistent Volume Claim bound to each instance of the StatefulSet. It is used to permanently store all the files corresponding to the internal databases and snapshots of a Hornet Node.
kubectl get pvc -n tangle -o=wide
NAME                         STATUS   VOLUME                                     CAPACITY   ACCESS MODES   STORAGECLASS   AGE
hornet-ledger-hornet-set-0   Bound    pvc-905fe9c7-6a10-4b29-a9fd-a405fd49a5fd   20Gi       RWO            standard       157m
The name of the Persistent Volume Claim is the concatenation of hornet-ledger plus the name of the bound Pod, hornet-set-0 in our case.
- Service objects:
- One Service Node Port object exposes the REST API of the nodes. It is a load balancer to port
14625of all the Nodes. - One Service Node Port object per Hornet instance (in this example, just one) which exposes as a "Node Port" the gossip, dashboard, and auto-peering endpoints.
- One Service Node Port object exposes the REST API of the nodes. It is a load balancer to port
kubectl get services -n tangle -o=wide
NAME          TYPE       CLUSTER-IP     EXTERNAL-IP   PORT(S)                                          AGE   SELECTOR
hornet-0      NodePort   10.60.4.75     <none>        15600:30744/TCP,8081:30132/TCP,14626:32083/UDP   19h   statefulset.kubernetes.io/pod-name=hornet-set-0
hornet-rest   NodePort   10.60.3.96     <none>        14265:31480/TCP                                  19h   app=hornet
You can run kubectl describe services -n tangle to get more details about the endpoints supporting the referred Services.
The name of the Services is important as it will allow you to address Hornet Nodes by DNS name within the cluster. For instance, if you want to peer a Hornet Node within the cluster, you can refer to it with the name of its bound Service, for example, hornet-0.
- An Ingress controller intended to expose the load-balanced Hornet REST API endpoint outside the cluster, under the
/apipath. For convenience, the dashboard corresponding to the first Hornet in the StatefulSet (hornet-0) is also exposed through the/path.
kubectl get ingress -n tangle -o=wide
NAME             CLASS    HOSTS   ADDRESS        PORTS   AGE
hornet-ingress   <none>   *       34.1.1.1   80      21h
In the example above, you can observe that the public IP address of the load balancer associated with the Ingress Controller is shown. This will happen when you deploy on a commercial, public cloud service.
- A ConfigMap that contains the configuration applied to each Hornet Node, including the peering configuration. Remember that your Hornet nodes, which belong to a StatefulSet, are peered among them.
kubectl get configmap -n tangle -o=wide
NAME               DATA   AGE
hornet-config      4      19h
kube-root-ca.crt   1      19h
Likewise, you can run kubectl describe configmap hornet-config to obtain more details about the ConfigMap.
Secrets of the Nodes (keys, etc.). Two secrets are created:
hornet-secret: Contains secrets related to the dashboard credentials (hash and salt).hornet-private-key: Contains the Ed25519 private keys of each node.
kubectl get secrets -n tangle -o=wide
NAME                  TYPE                                  DATA   AGE
default-token-fks6m   kubernetes.io/service-account-token   3      20h
hornet-private-key    Opaque                                1      20h
hornet-secret         Opaque                                2      20h
This blueprint does not provide Network Policies. However, in a production environment, they should be defined so that Pods are properly restricted to perform outbound connections or receive inbound connections.
Accessing Your Hornet Node
Once you have deployed your Hornet Node on the cluster, you will want to access it from the outside. Fortunately, that is easy as you have already created K8s Services of type Node Port. This means that your Hornet Node will be accessible through certain ports published on the K8s machine (worker node in K8s terminology) where Hornet is actually running.
If you execute:
kubectl get services -n tangle
hornet-0      NodePort   10.60.4.75     <none>        15600:30744/TCP,8081:30132/TCP,14626:32083/UDP   20h
hornet-rest   NodePort   10.60.3.96     <none>        14265:31480/TCP                                  20h
In the example above, the REST API endpoint of your Hornet Node will be accessible through the port 31480 of a K8s worker. Likewise, the Hornet dashboard will be exposed on the port 30744.
If you are running microk8s locally in your machine, you will typically have only one K8s machine running as a virtual machine. Usually, the IP address of the virtual machine is 192.168.64.2. You can double-check the IP address by displaying your
current kubectl configuration running the following command:
kubectl config view | grep server
You should receive an output similar to the endpoint of the K8s API Server.
server: https://192.168.64.2:16443
Additionally, you can get access to your Hornet Node REST API endpoint through the external load balancer defined by the Ingress Controller. If you are using a local configuration, this will not make much difference as the machine where the Ingress Controller lives is the same as the Service machine (more details at https://kubernetes.github.io/ingress-nginx). However, in the case of a real environment provided by a public cloud provider, your Ingress controller will usually be mapped to a load balancer exposed through a public IP address. You can find more information in the commercial public cloud environment's specifics section.
Remember that it might take a while for your Hornet Pods to be running and ready
Working With Multiple Instances
If you want to work with multiple instances, you can scale your current K8s StatefulSet by running:
INSTANCES=2 hornet-k8s.sh scale
If the cluster has enough resources, a new Hornet Node will automatically be spawned and peered with your original one.
You will notice that one more Pod (hornet-set-1) will be running:
kubectl get pods -n tangle -o=wide
NAME           READY   STATUS    RESTARTS   AGE
hornet-set-0   1/1     Running   0          24h
hornet-set-1   1/1     Running   0          24h
However, if your cluster does not have enough resources, the new POD will still be listed but its status will be Pending:
hornet-set-1 0/1 Pending 0 2m12s
You can find more details on the reasons why the new Pod is not running by executing:
kubectl describe pods/hornet-set-1 -n tangle
If your Pod is running properly, a new Persistent Volume will be listed as well:
kubectl get pvc -n tangle -o=wide
hornet-ledger-hornet-set-0   Bound    pvc-905fe9c7-6a10-4b29-a9fd-a405fd49a5fd   20Gi       RWO            standard       24h
hornet-ledger-hornet-set-1   Bound    pvc-95b3b566-4602-4a36-8b1b-5e6bf75e5c6f   20Gi       RWO            standard       24h
And an additional Service hornet-1:
kubectl get services -n tangle -o=wide
NAME          TYPE       CLUSTER-IP     EXTERNAL-IP   PORT(S)                                          AGE
hornet-0      NodePort   10.60.4.75     <none>        15600:30744/TCP,8081:30132/TCP,14626:32083/UDP   24h
hornet-1      NodePort   10.60.7.44     <none>        15600:32184/TCP,8081:31776/TCP,14626:31729/UDP   24h
hornet-rest   NodePort   10.60.3.96     <none>        14265:31480/TCP                                  24h
The REST service will be load balancing two Pods. You can verify this by running the following command:
kubectl describe services/hornet-rest -n tangle
Name:                     hornet-rest
Namespace:                tangle
Labels:                   app=hornet-api
                          source=one-click-tangle
Selector:                 app=hornet
Type:                     NodePort
IP Family Policy:         SingleStack
IP Families:              IPv4
IP:                       10.60.3.96
IPs:                      10.60.3.96
Port:                     rest  14265/TCP
TargetPort:               14265/TCP
NodePort:                 rest  31480/TCP
Endpoints:                10.56.0.18:14265,10.56.9.32:14265
Session Affinity:         None
External Traffic Policy:  Cluster
If your hornet-0 node is synced, hornet-1 should also be synced as hornet-0 and hornet-1 will have peered. You can verify this by connecting to the corresponding dashboards.
Deep Dive. The "One-Click" Script Internals
In this section, you can find the internals of our blueprints for deploying Hornet Nodes on K8s. The figure below depicts the target deployment architecture behind our proposed blueprint.
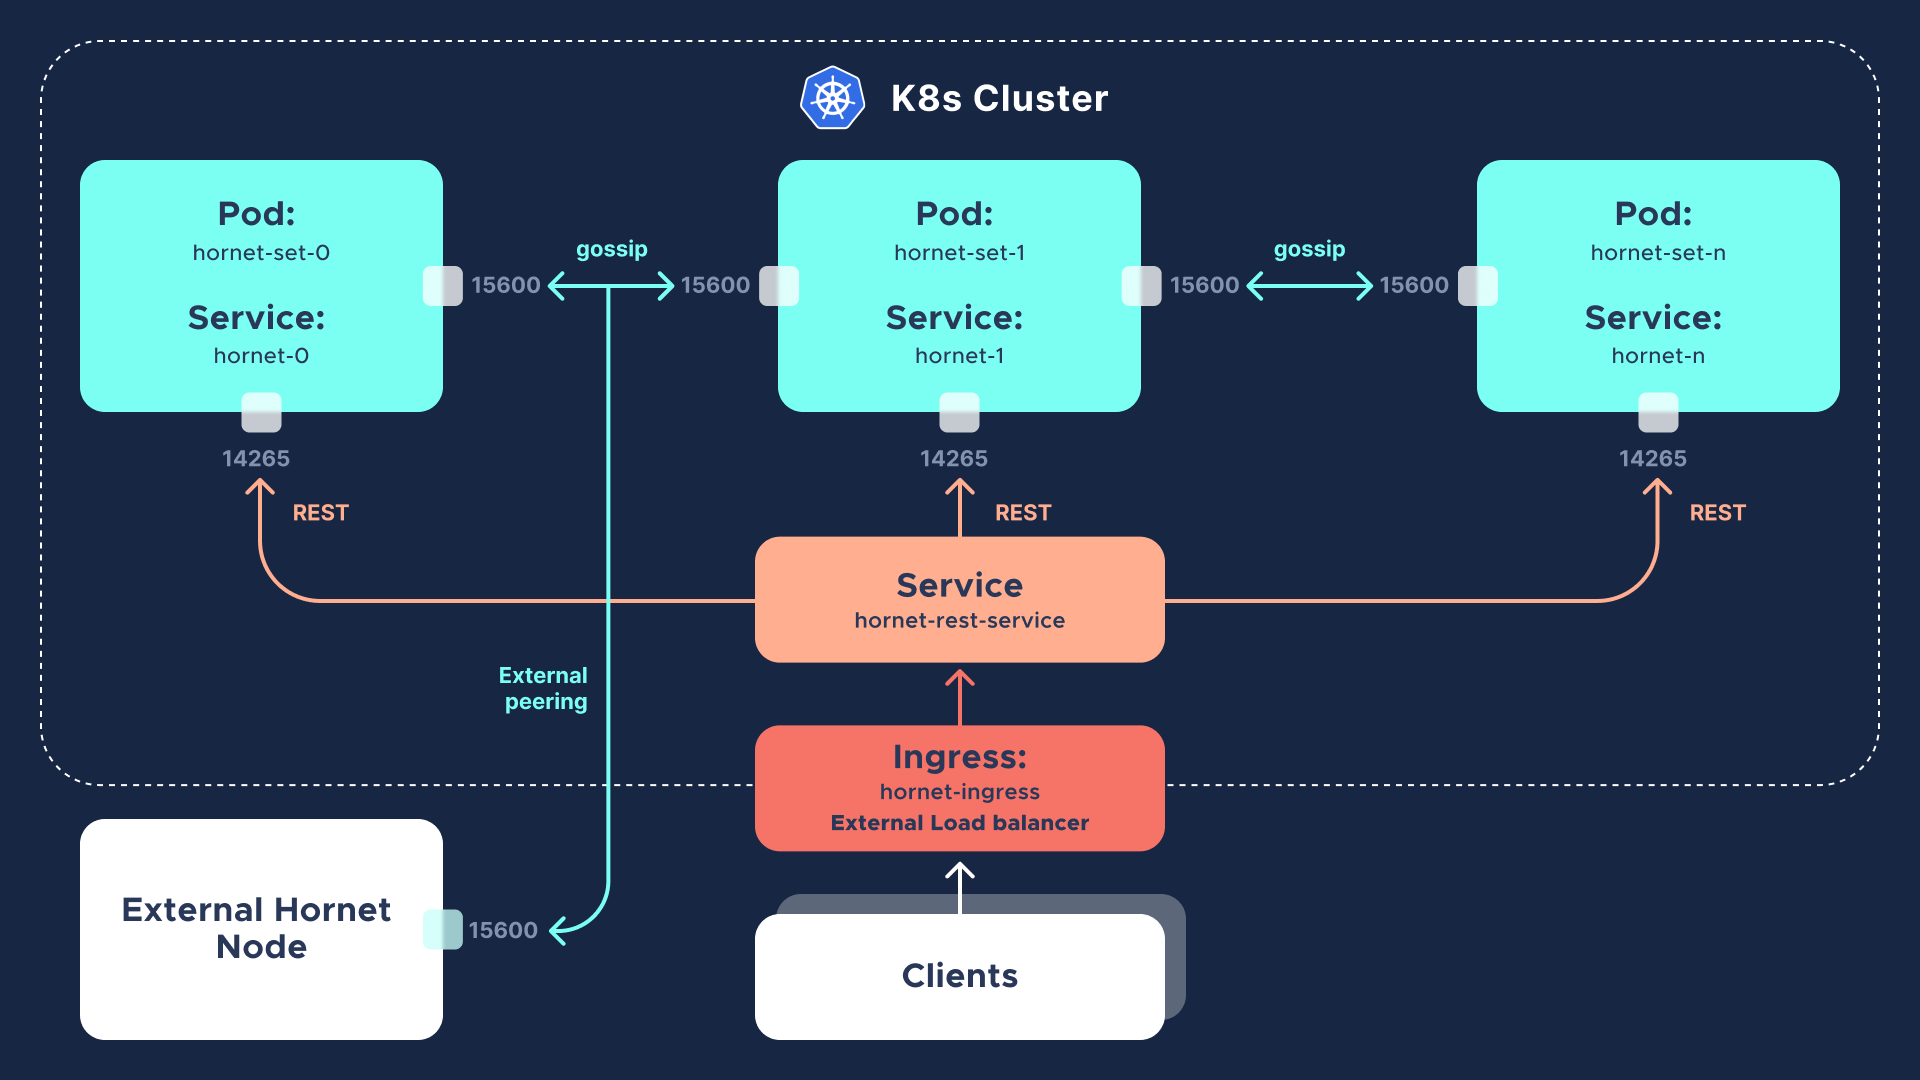
The figure shows the K8s objects used and their relationships. The following sections will provide more details about them, and the K8s manifests that declare them (available at the repository). The label source=one-click-tangle is used to mark these K8s objects that will live under a specific Namespace (named tangle by default).
StatefulSet hornet-set
The hornet.yaml source file contains the definition of the StatefulSet (hornet-set) that templates and controls the execution of the Hornet Pods. The StatefulSet is also bound to a volumeClaimTemplate so that each Hornet Node on the set can be bound to its own K8s Persistent Volume. The StatefulSet is labeled as source=one-click-tangle and the selector used for the Pods is app=hornet. Additionally, the StatefulSet is bound to the Service hornet-rest.
The template contains the Pod definition, which declares different volumes:
configurationwhich is mapped to thehornet-configConfigMap.private-keywhich is mapped to thehornet-private-keySecret.secrets-volumeanemptyDirinternal volume where the Hornet Node private key will be actually copied.
The Pod definition within the StatefulSet contains one initialization container (create-volumes) and one regular container (hornet). The initialization container is in charge of preparing the corresponding volumes so that the hornet container volume mounts are ready to be used with the proper files inside and suitable permissions. The initialization container copies the Hornet Node private key and peering configuration so that each Hornet is bound to its private key and peering details.
The hornet container declares the following volume mounts, which are key for the hornet container to run properly within its Pod:
/app/config.jsonagainst theconfigurationvolume.app/p2p2storeagainst thep2pstoresubfolder of thehornet-ledgerPersistent Volume.app/p2pstore/identity.keyagainst the transient, internalsecrets-volumeof the Pod.app/peering.jsonagainst thepeeringsubfolder of thehornet-ledgerPersistent Volume. This is necessary as the peering configuration is dynamic, and new peers might be added during the lifecycle of the Hornet Node.app/mainnetdbagainst themainnetdbsubfolder of thehornet-ledgerPersistent Volume to store the database files.app/snapshots/mainnetagainst thesnapshotssubfolder of thehornet-ledgerPersistent Volume to store snapshots.
The Pod template configuration also declares extra configuration details such as liveness and readiness probes, security contexts, and links to other resources such as the Secret that defines the dashboard credentials, mapped into environment variables.
Services
Two different kinds of Services are used in our blueprint:
A Node Port Service
hornet-rest(declared by thehornet-rest-service.yamlmanifest) that is bound to the StatefulSet and the port14265of the Hornet Nodes. Its purpose is to expose the REST API endpoint of the Hornet nodes. The endpoint Pods of such a Service are labeled asapp=hornet.One Node Port Service (
hornet-0,hornet-1, ...,hornet-n) per Hornet Node, declared by thehornet-service.yamlmanifest. These Node Port Services expose access to the individual dashboard and gossip and auto-peering endpoints of each node. Thus, it is only bound to one and only one Hornet Node. For this purpose, its configuration includesexternalTrafficPolicylocaland a selector namedstatefulset.kubernetes.io/pod-name: hornet-set-xwherexcorresponds to the Pod number of the Hornet Node the Service is bound. Under the hood, the one-click script takes care of creating as many Services of this type as needed.
Ingress Controller hornet-ingress
The Ingress Controller hornet-ingress is configured so that the hornet-rest Service can be externally load-balanced. There are two path mappings, /api, whose backend is the hornet-rest Service, and / whose backend is the dashboard of the hornet-0 Service. The latter exists for convenience reasons of this blueprint. In the default configuration, the kubernetes.io/ingress.class is nginx, but you can override that for specific cloud environments (see below).
ConfigMap and Secrets
For ConfigMaps and Secrets, there are no YAML definition files as they are created on the fly through the kubectl command line.
They are created from a config directory automatically generated by the "one-click" script. You can see the contents of those objects by running the following command:
kubectl get configmap/hornet-config -n tangle -o=yaml
The same goes for the Hornet dashboard credentials (all the nodes share the same admin credentials).
kubectl get secrets/hornet-secret -n tangle -o=yaml
As well as for the Nodes' private keys:
kubectl get secrets/hornet-private-key -n tangle -o=yaml
Commercial Public Cloud Environments Specifics
Google Kubernetes Environment (GKE)
The deployment recipes are fully portable to the GKE public cloud environment. You will only need to ensure that the Ingress Controller is correctly annotated with kubernetes.io/ingress.class: gce. You can do this by executing the following command:
kubectl annotate -f hornet-ingress.yaml -n $NAMESPACE --overwrite kubernetes.io/ingress.class=gce
Alternatively, if you are using the "one-click" script you can simply execute the following command and the one-click script will perform the annotation during the deployment process.:
INGRESS_CLASS=gce hornet-k8s.sh deploy
The process of deploying an external load balancer by a public cloud provider can take a while.
If you want to get access to the Service Node Ports, you will need to have a cluster with public K8s workers. You can determine the public IP addresses of your K8s workers by running:
kubectl get nodes -o=wide
Then, you can determine on which K8s worker your Hornet Pod is running by executing the following command (the default NAMESPACE is tangle):
kubectl get pods -n $NAMESPACE -o=wide
Once you determine the worker and its IP address, you can access each Hornet Node by knowing the Node ports declared by the corresponding service. You can do this by running the following command:
kubectl get services -n $NAMESPACE
Once you know the port, you will have to create firewall rules so that the port is reachable. That can be done using the gcloud tool. For instance, if your Hornet Node's dashboard is mapped to port 34200 and the public IP address of our K8s worker is 1.1.1.1:
gcloud compute firewall-rules create test-hornet-dashboard --allow tcp:34200
Now, you can open up a browser and load http://1.1.1.1:34200 to access the Hornet Node's dashboard.
You may also have to look into encrypting Secrets when moving to a production-ready system.
Amazon Kubernetes Environment (EKS)
The deployment recipes are fully portable to the EKS commercial public cloud environment. However, there are certain preparation steps (including IAM permission grants) that have to be executed on your cluster so that the Ingress Controller is properly mapped to an AWS Application Load Balancer (ALB). Additionally, as it happens with the GKE environment, you can access your Hornet Nodes through its Service Node Port. The procedure requires a cluster with public workers and security groups configured so that traffic is enabled to the corresponding Service Node Ports.
You will need to follow several preparation steps on your cluster to map the Ingress Controller objects to AWS Application Load Balancers. Please read these documents and follow the corresponding instructions on your cluster:
- AWS Docs - Create a kubeconfig for Amazon EKS
- AWS Docs - Application load balancing on Amazon EKS
- AWS Docs - AWS Load Balancer Controller
- Kubernets Docs - AWS Load Balancer Controller
You will also need to annotate your Ingress Controller with the following:
kubernetes.io/ingress.class=albalb.ingress.kubernetes.io/scheme=internet-facingalb.ingress.kubernetes.io/subnets: A comma-separated list of the IDs of the subnets that can actually host the Services being load balanced, for instancesubnet-aa1649cc, subnet-a656cffc, subnet-fdf3dcb5.
Remember that you can annotate your Ingress Controller by running kubectl annotate.
If you have made all the preparations and annotations properly, you will be able to find the DNS name of your external load balancer when you execute the following command (Please note it can take a while for DNS servers to sync up):
kubectl get ingress -n $NAMESPACE -o=wide
NAME             CLASS    HOSTS   ADDRESS                                                                 PORTS   AGE
hornet-ingress   <none>   *       xyz.eu-west-1.elb.amazonaws.com                                         80      71m
Conclusion
Reference recipes are key in facilitating the deployment of IOTA mainnet Hornet nodes. The IOTA Foundation provides them as a blueprint that can be customized by developers and administrators in their journey towards production-ready deployment. The reference recipes have been designed with portability and simplicity in mind and tested successfully on some popular commercial public cloud environments.